PuTTrY

![]()
A secure, browser-based terminal that keeps your server sessions alive across devices and networks. Work seamlessly across your phone, laptop, and desktop without restarting your processes.
Table of Contents
- Project Website
- What is PuTTrY?
- Why Web-Based Over SSH?
- Getting Started
- User Guide
- Configuration Reference
- Managing Terminal Sessions
- Guest Links
- File Manager
- Security Architecture
- Network and Infrastructure Security
- Technical Architecture
- Development
- Contributing
- Connect
- License
Project Website
For more information about PuTTrY, visit the official website at puttry.io, which features:
- Feature highlights and use cases
- Enterprise security overview (password protection, 2FA, passkeys, TOTP)
- Team collaboration capabilities
- Latest updates and project news
- Links to all documentation resources
What is PuTTrY?
PuTTrY is a single-user, web-based terminal emulator that runs on your server, allowing you to access and control your terminal sessions from any browser. Unlike traditional SSH clients, PuTTrY decouples the terminal interface from your SSH credentials—your server sessions persist independently of which device you’re using, and your security is managed centrally at the backend.
Single-User Per Instance
PuTTrY is designed to be run by a single user in their home directory. Each terminal session created via PuTTrY inherits the permissions of the user who started it—exactly the same as SSH. If multiple users on the same server want to use PuTTrY, each must run their own separate instance in their respective home directory. Multiple PuTTrY instances on the same server require different host ports. PuTTrY supports secure guest access via Guest Links, allowing colleagues to observe or request control of terminal sessions without sharing your credentials. Its core design is as a personal terminal for one user across many devices.
Perfect For
- Agentic AI with long-running tasks: Start an autonomous agent on your server from your work machine, then monitor its progress from your phone on your commute without interrupting the process
- CLI-controlled systems: Maintain persistent connections to command-line tools and services that expect continuous sessions
- Cross-device workflows: Begin work on a desktop, seamlessly continue from a laptop or mobile device without reconnecting
- Collaborative troubleshooting: Invite a colleague with a Guest Link so they can observe your terminal sessions and optionally request control — no password sharing required
- On-the-go administration: Interact with critical server processes from anywhere, even from devices never designed for SSH
About the name: PuTTrY is a homage to PuTTY, the pioneering SSH client created in the late 1990s that revolutionized terminal access for countless users. While PuTTrY takes a fundamentally different approach—shifting from desktop client to web-based backend—we honor the technical innovation and reliability that made PuTTY indispensable for decades. Some people still use PuTTY today. This project builds on the foundation of solutions that worked seamlessly across generations of computing.
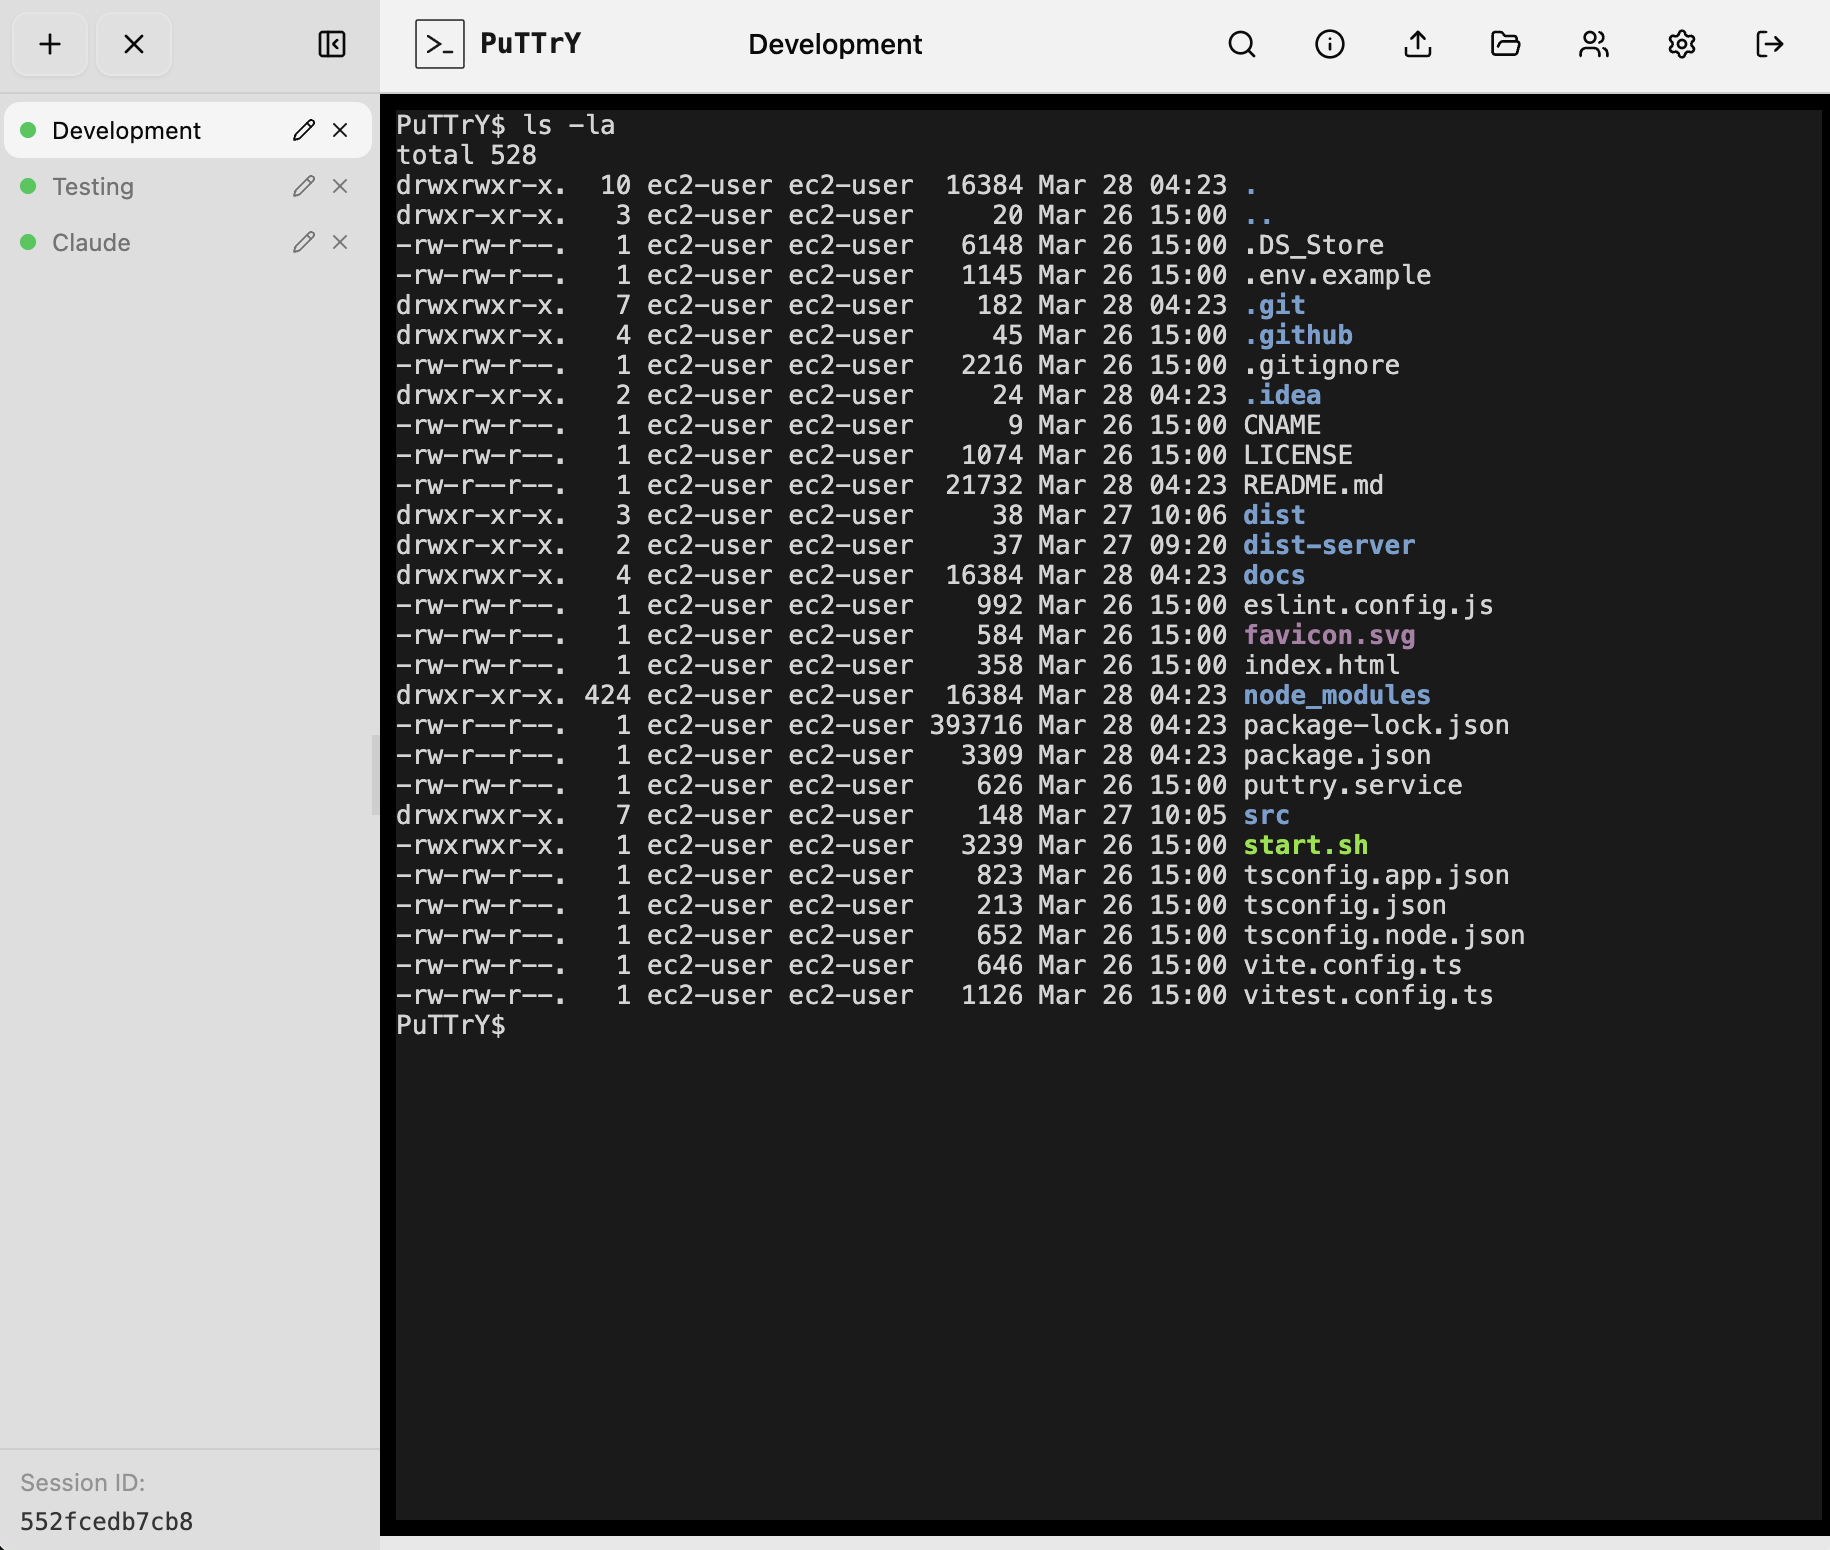
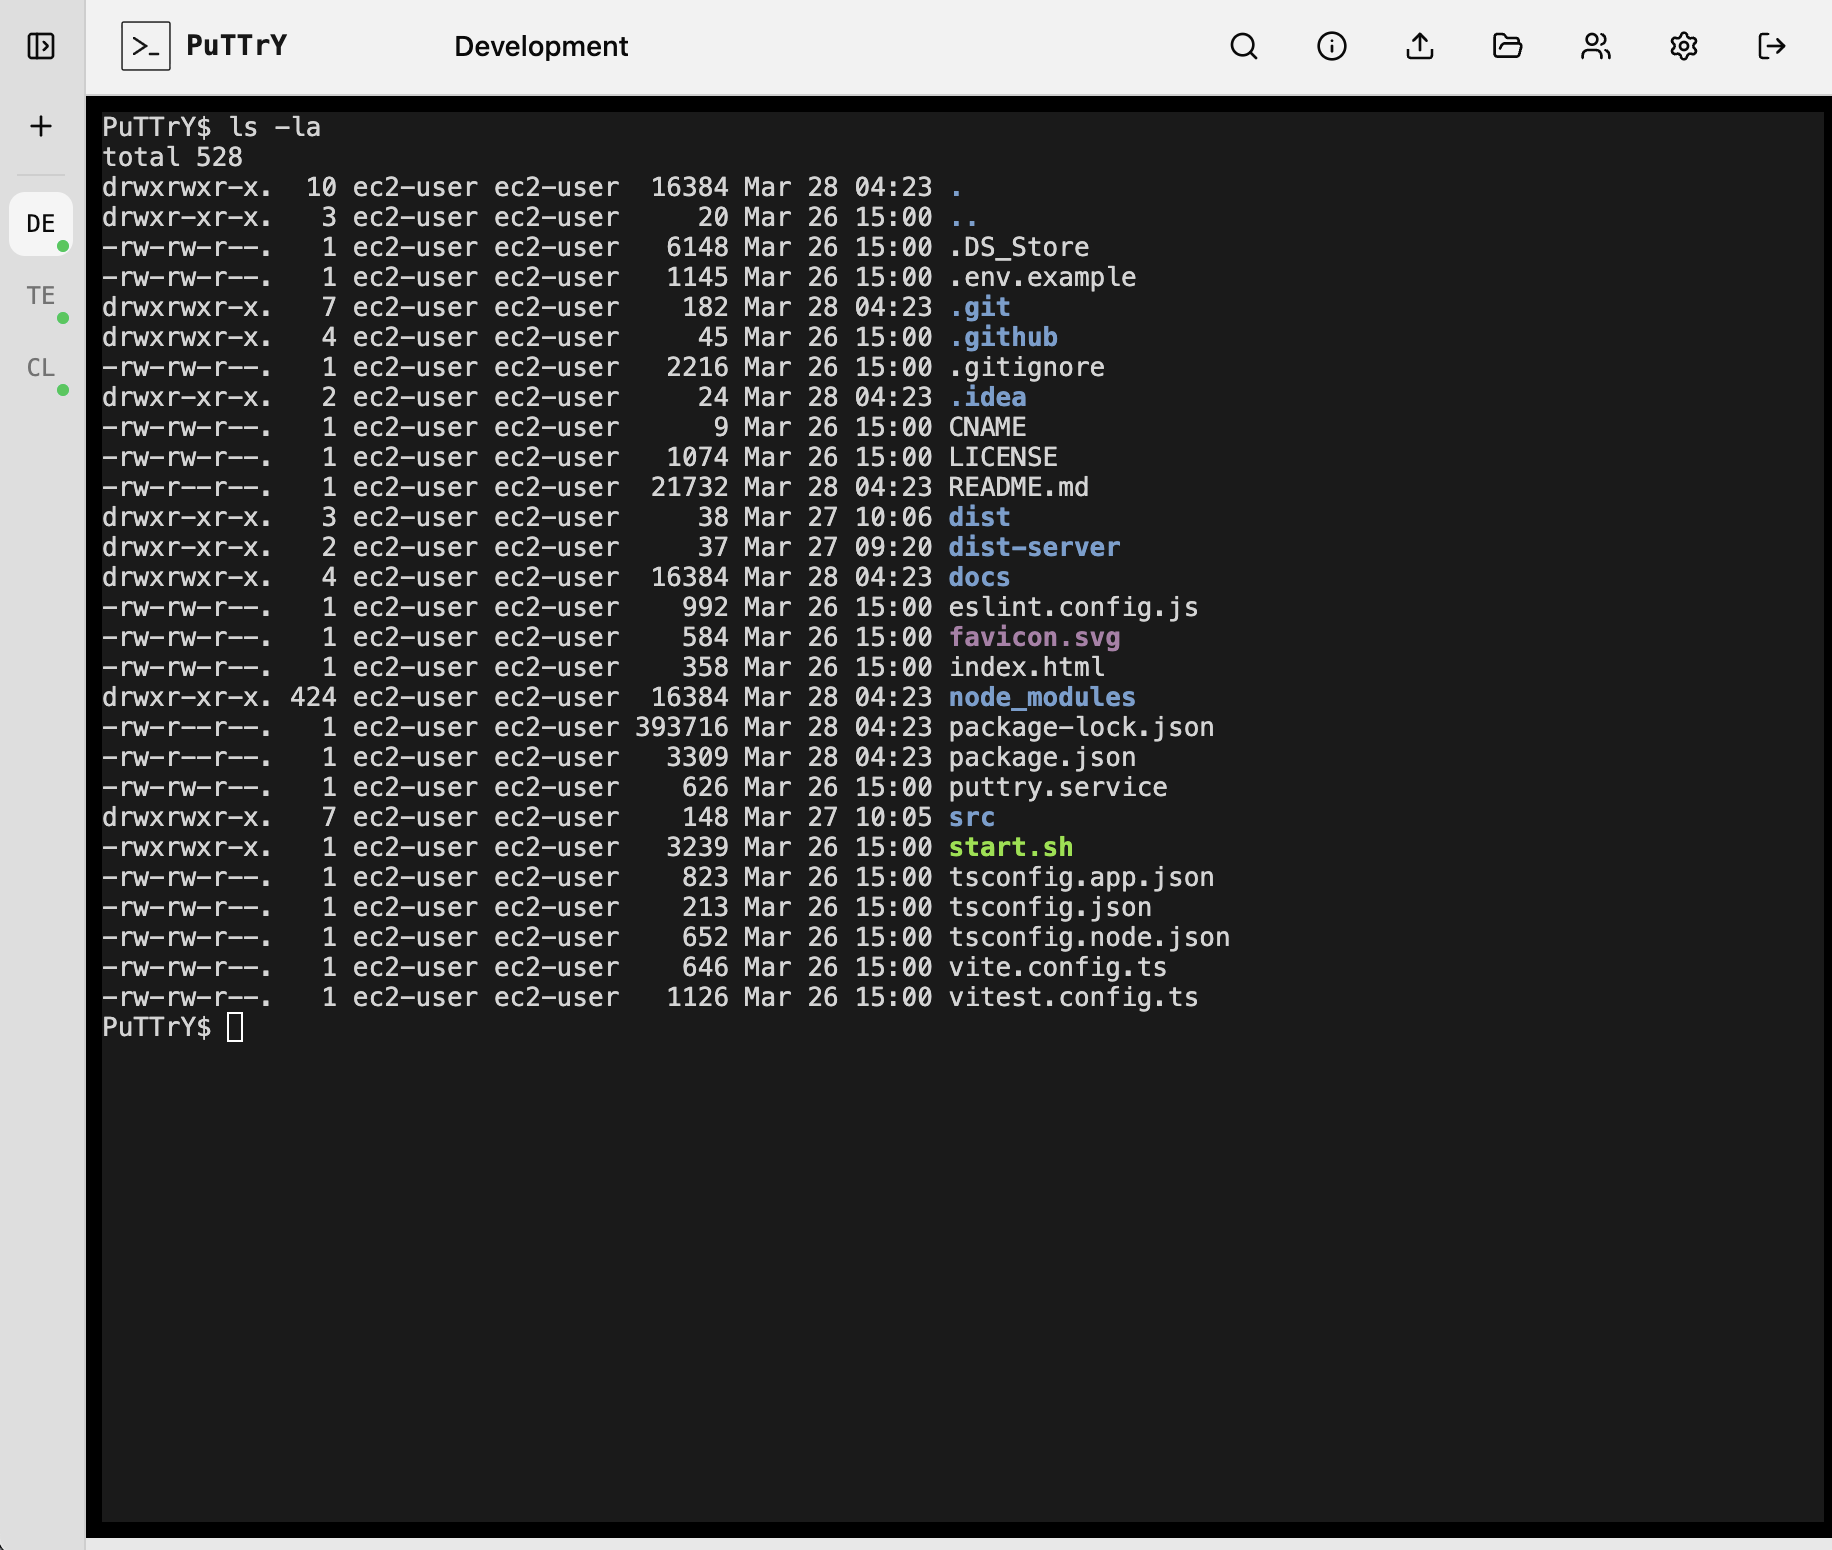
Web Interface Overview
The left screenshot shows the sidebar expanded, allowing you to manage terminal sessions—rename tabs, reorder them, and switch between active sessions. The right screenshot shows the sidebar collapsed for maximum terminal viewing area when you need full screen real estate.
|
|
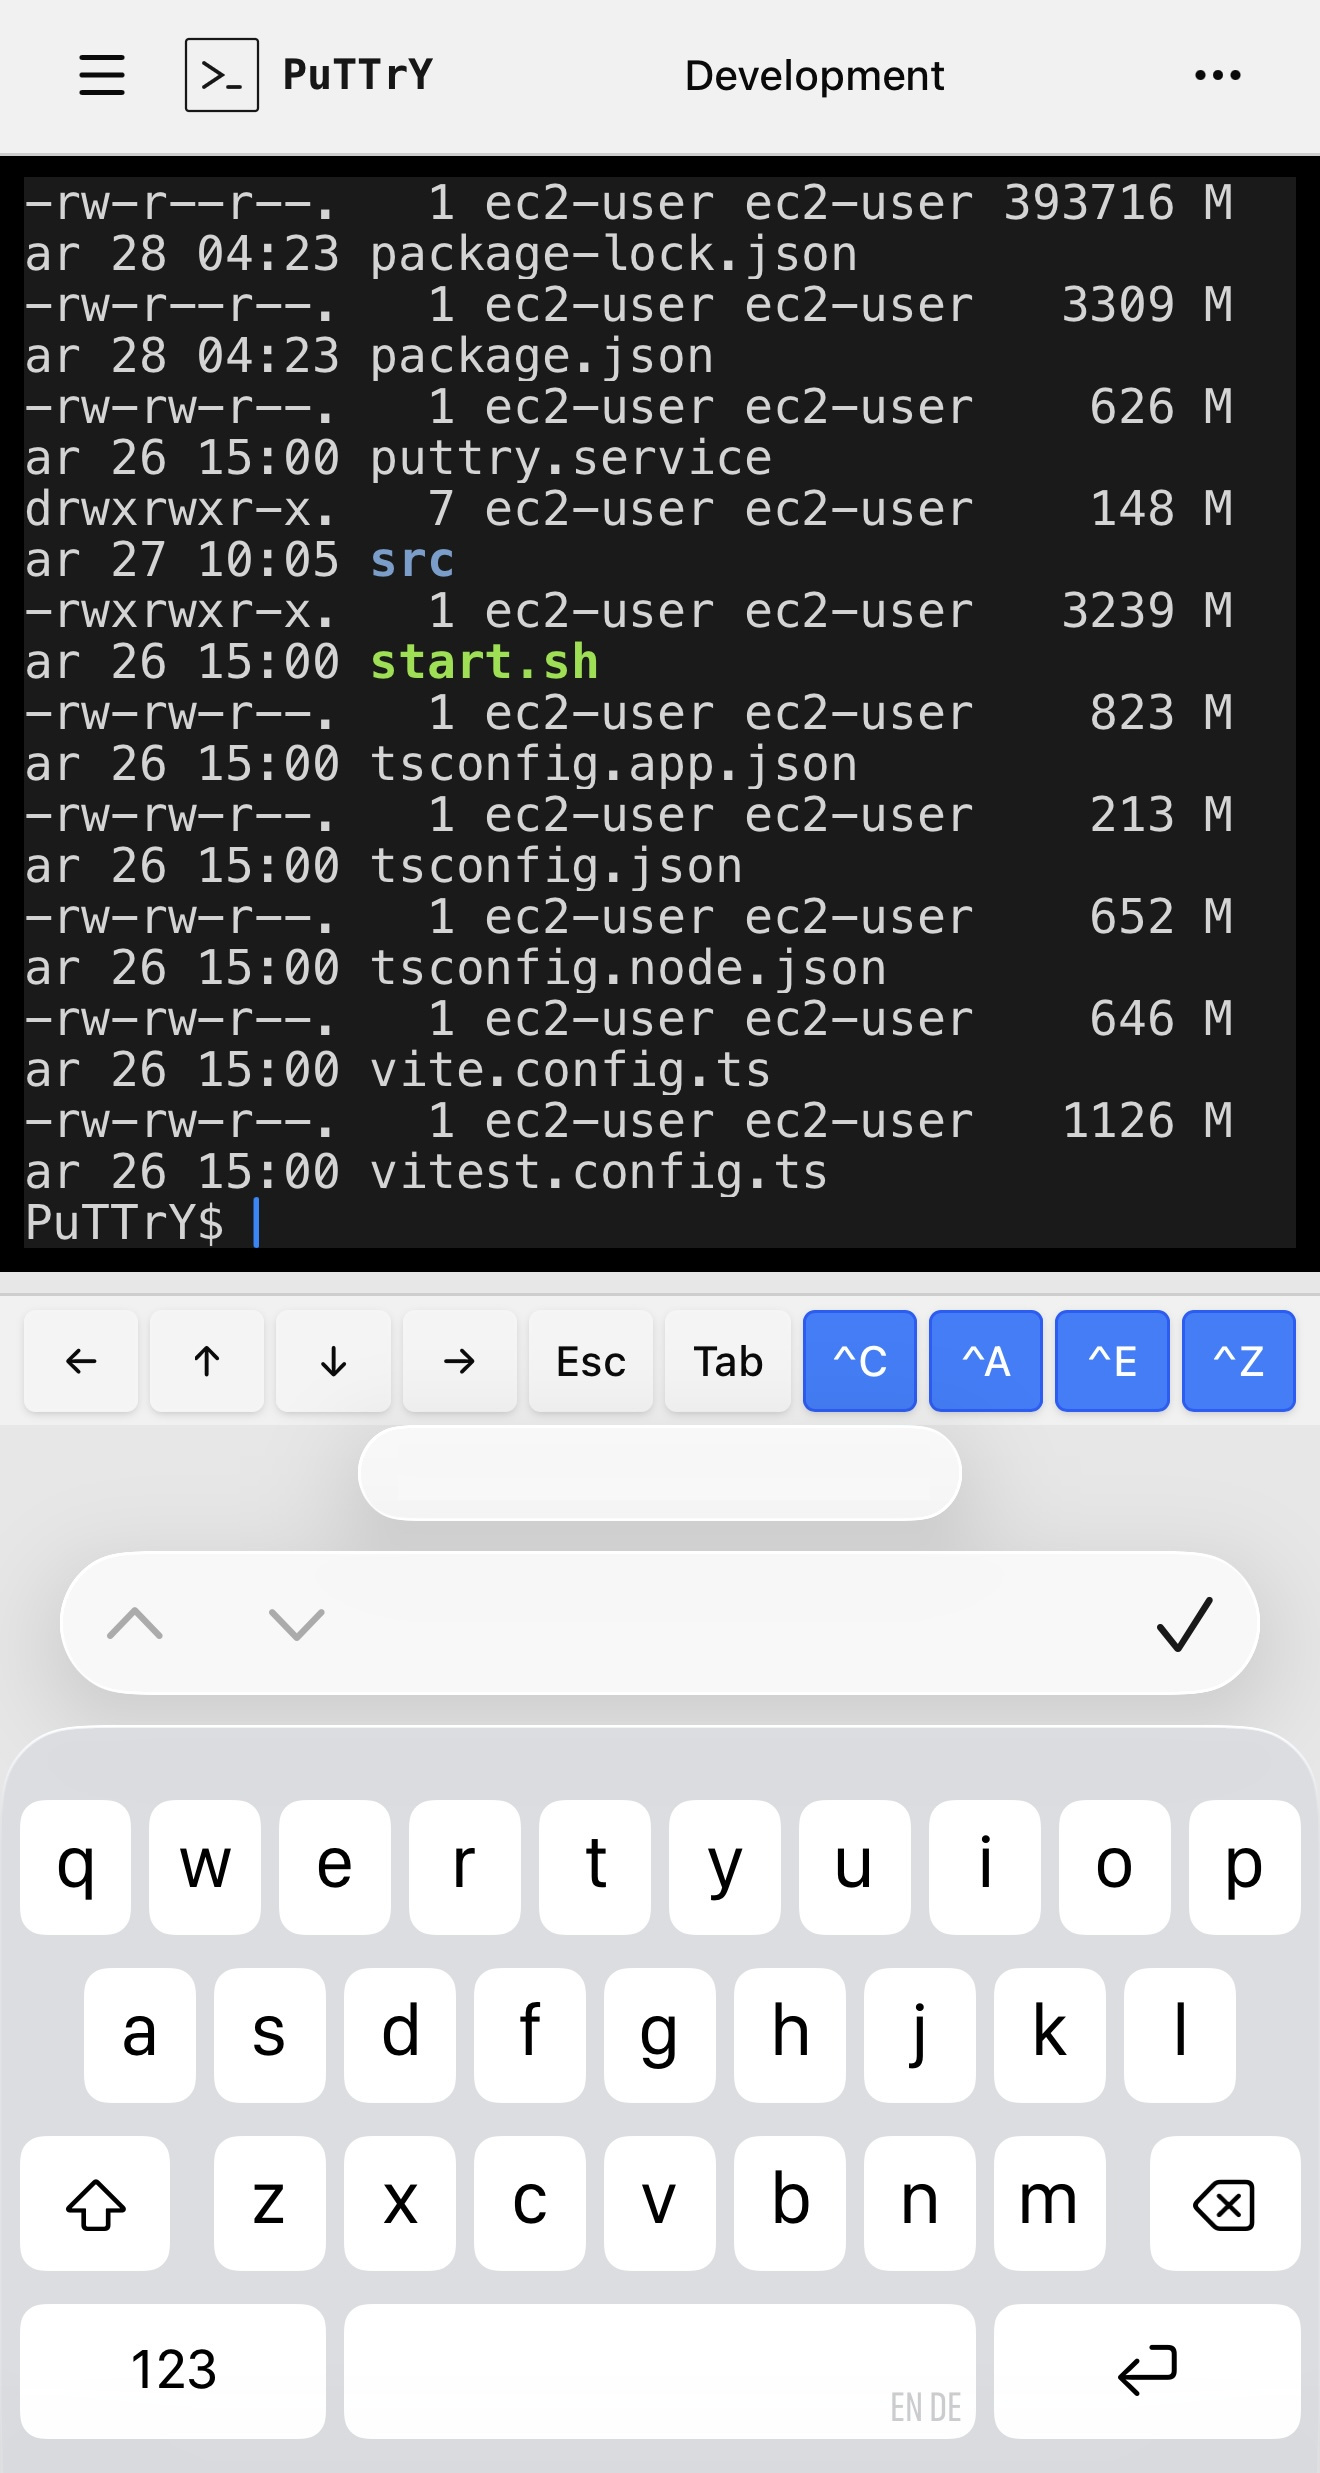
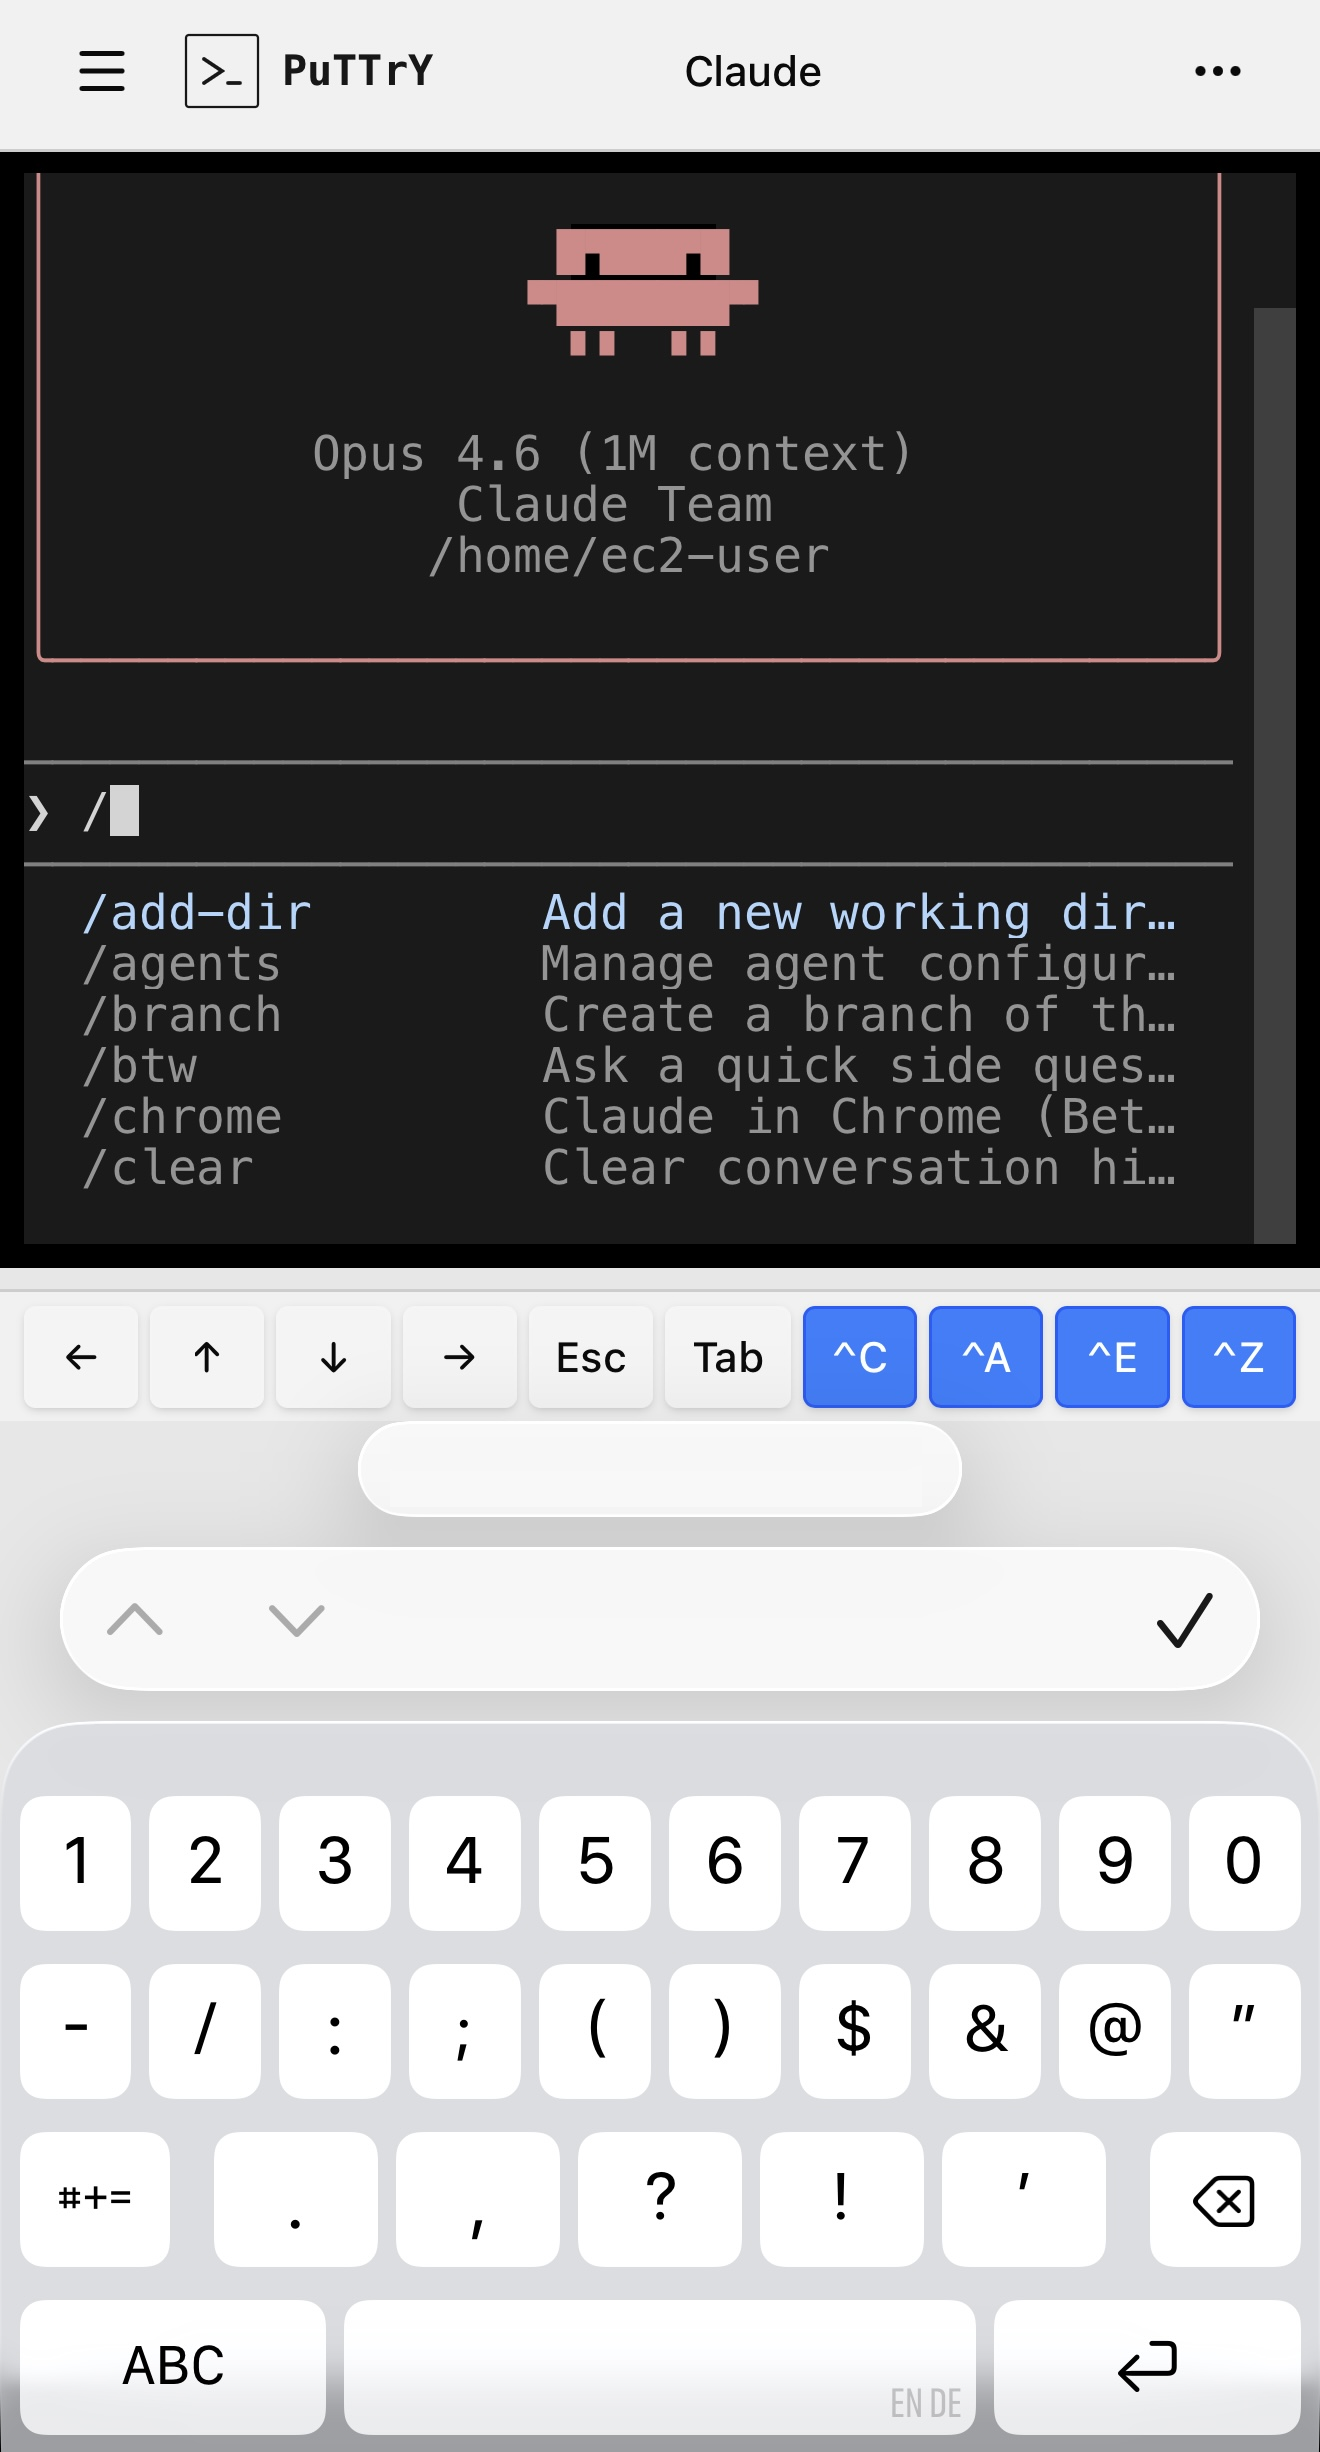
Works Great on Mobile Too
PuTTrY is fully optimized for mobile browsers. Both screenshots illustrate mobile shell interactions—direct terminal access and interactive CLI applications.
|
|
Why Web-Based Over SSH?
SSH is a battle-tested tool that’s been securing remote access for decades. But it’s not designed for effortless access from anywhere—it requires upfront setup and key management on every device you want to use.
Session Continuity Across Devices
SSH ties your terminal to your client machine. Each connection is independent—if you close your laptop, your SSH session dies, even if your background process is still running on the server.
With PuTTrY, your terminal session lives on the server, independent of which device you’re using:
- Start debugging a long-running process on your work desktop
- Close your laptop and seamlessly continue from your phone on the train home using the same terminal session
- Switch to your home desktop later—your session is still there, unchanged
- Return to your office desktop the next day with all your history and context intact
The process keeps running. The shell state persists. Only your browser window changes.
Quick, Device-Agnostic Login
SSH requires setup before your first connection: generate keys, distribute public keys, configure ~/.ssh/config, handle different key locations on different machines. It’s powerful, but not quick.
PuTTrY gets you connected with one password, anywhere. Your phone, a tablet, a borrowed laptop, a machine you’ve never used before—just open a browser and authenticate. No keys to distribute. No setup per device.
Mobile-Friendly
SSH on mobile is awkward:
- Key distribution: Copying SSH private keys to your phone duplicates a sensitive credential on a device with different security guarantees
- UX friction: Most phones aren’t designed for SSH; you’re fighting the platform
- Setup burden: Each device that needs access requires its own key configuration
PuTTrY is designed for the browser. Authenticate once, get a session token in a cookie, and continue working. Your session password lives on the server, not on your device.
Network Security and Infrastructure Flexibility
Exposing SSH to the internet for external access is a significant security concern. SSH servers are frequently targeted by automated attacks, and managing firewall rules and key distribution at scale creates operational risk.
PuTTrY, running as a standard web backend, can be protected using the same mature infrastructure security tooling available for any modern web application:
- Reverse proxies and load balancers with rate limiting and DDoS protection
- WAF (Web Application Firewall) rules to block malicious requests
- IP whitelisting and VPN tunneling for restricted access
- Certificate management with auto-renewal via services like Let’s Encrypt
- Cloud provider integrations (AWS ALB, Google Cloud LB, Azure App Service, etc.) that handle HTTPS and scaling
You don’t need to expose a new port to the internet or manage a separate SSH hardening strategy. PuTTrY integrates into your existing web security infrastructure.
For comprehensive guidance on HTTPS, certificate management, VPN tunneling, reverse proxies, and other deployment strategies, see Network and Infrastructure Security.
Getting Started
Prerequisites
Before installing PuTTrY, ensure you have:
- Node.js 20 or later (download)
- npm 10 or later (bundled with Node.js)
Step 1: Install
Install PuTTrY globally using npm:
npm install -g @chfischerx/puttry
Note: The
-gflag is required. The install snippet shown on the npmjs.com package page omits it — usingnpm i @chfischerx/puttrywithout-ginstalls the package locally and theputtrycommand will not be available in your shell.
Step 2: Configure (Recommended)
Run the interactive configuration wizard to set up PuTTrY for your environment:
puttry configure
This walks you through setting up:
- Port (default: 5174)
- Password type (random or custom)
- 2FA (TOTP or passkeys — passkeys can also replace password entirely)
- Other preferences
Note: Configuration is optional—PuTTrY works with defaults out of the box. However, running puttry configure first ensures the setup matches your environment.
Settings can be changed anytime via the Web UI settings panel or the puttry config set command.
Step 3: Start
Start the PuTTrY server:
puttry start
PuTTrY will display:
- Your session password
- The direct URL to access PuTTrY in your browser
Open the URL in your browser to access the web interface. You’re ready to create terminal sessions!
User Guide
Once PuTTrY is running, the User Guide walks you through every feature of the web interface:
- Logging in with password, 2FA (TOTP), and passkeys
- The interface: sidebar, terminal area, and toolbar
- Mobile browser usage: touch interactions, floating keyboard (iOS), and mobile-optimized features
- Terminal sessions: creating, switching, renaming, and managing sessions
- Working across devices: session continuity, shared output, write lock coordination
- File manager: uploading files, browsing, downloading as ZIP
- Settings: changing passwords, configuring 2FA and passkeys, port configuration
- Troubleshooting: common issues and solutions
- Tips and workflows: real-world usage patterns
Start with the User Guide to learn how to use PuTTrY effectively.
Configuration Reference
Configuration Files and Directories
On first run, PuTTrY creates a .puttry directory in your home folder containing:
session-password.txt: Your session password for authentication2fa.json: 2FA configuration (if enabled)sessions/: Terminal session data
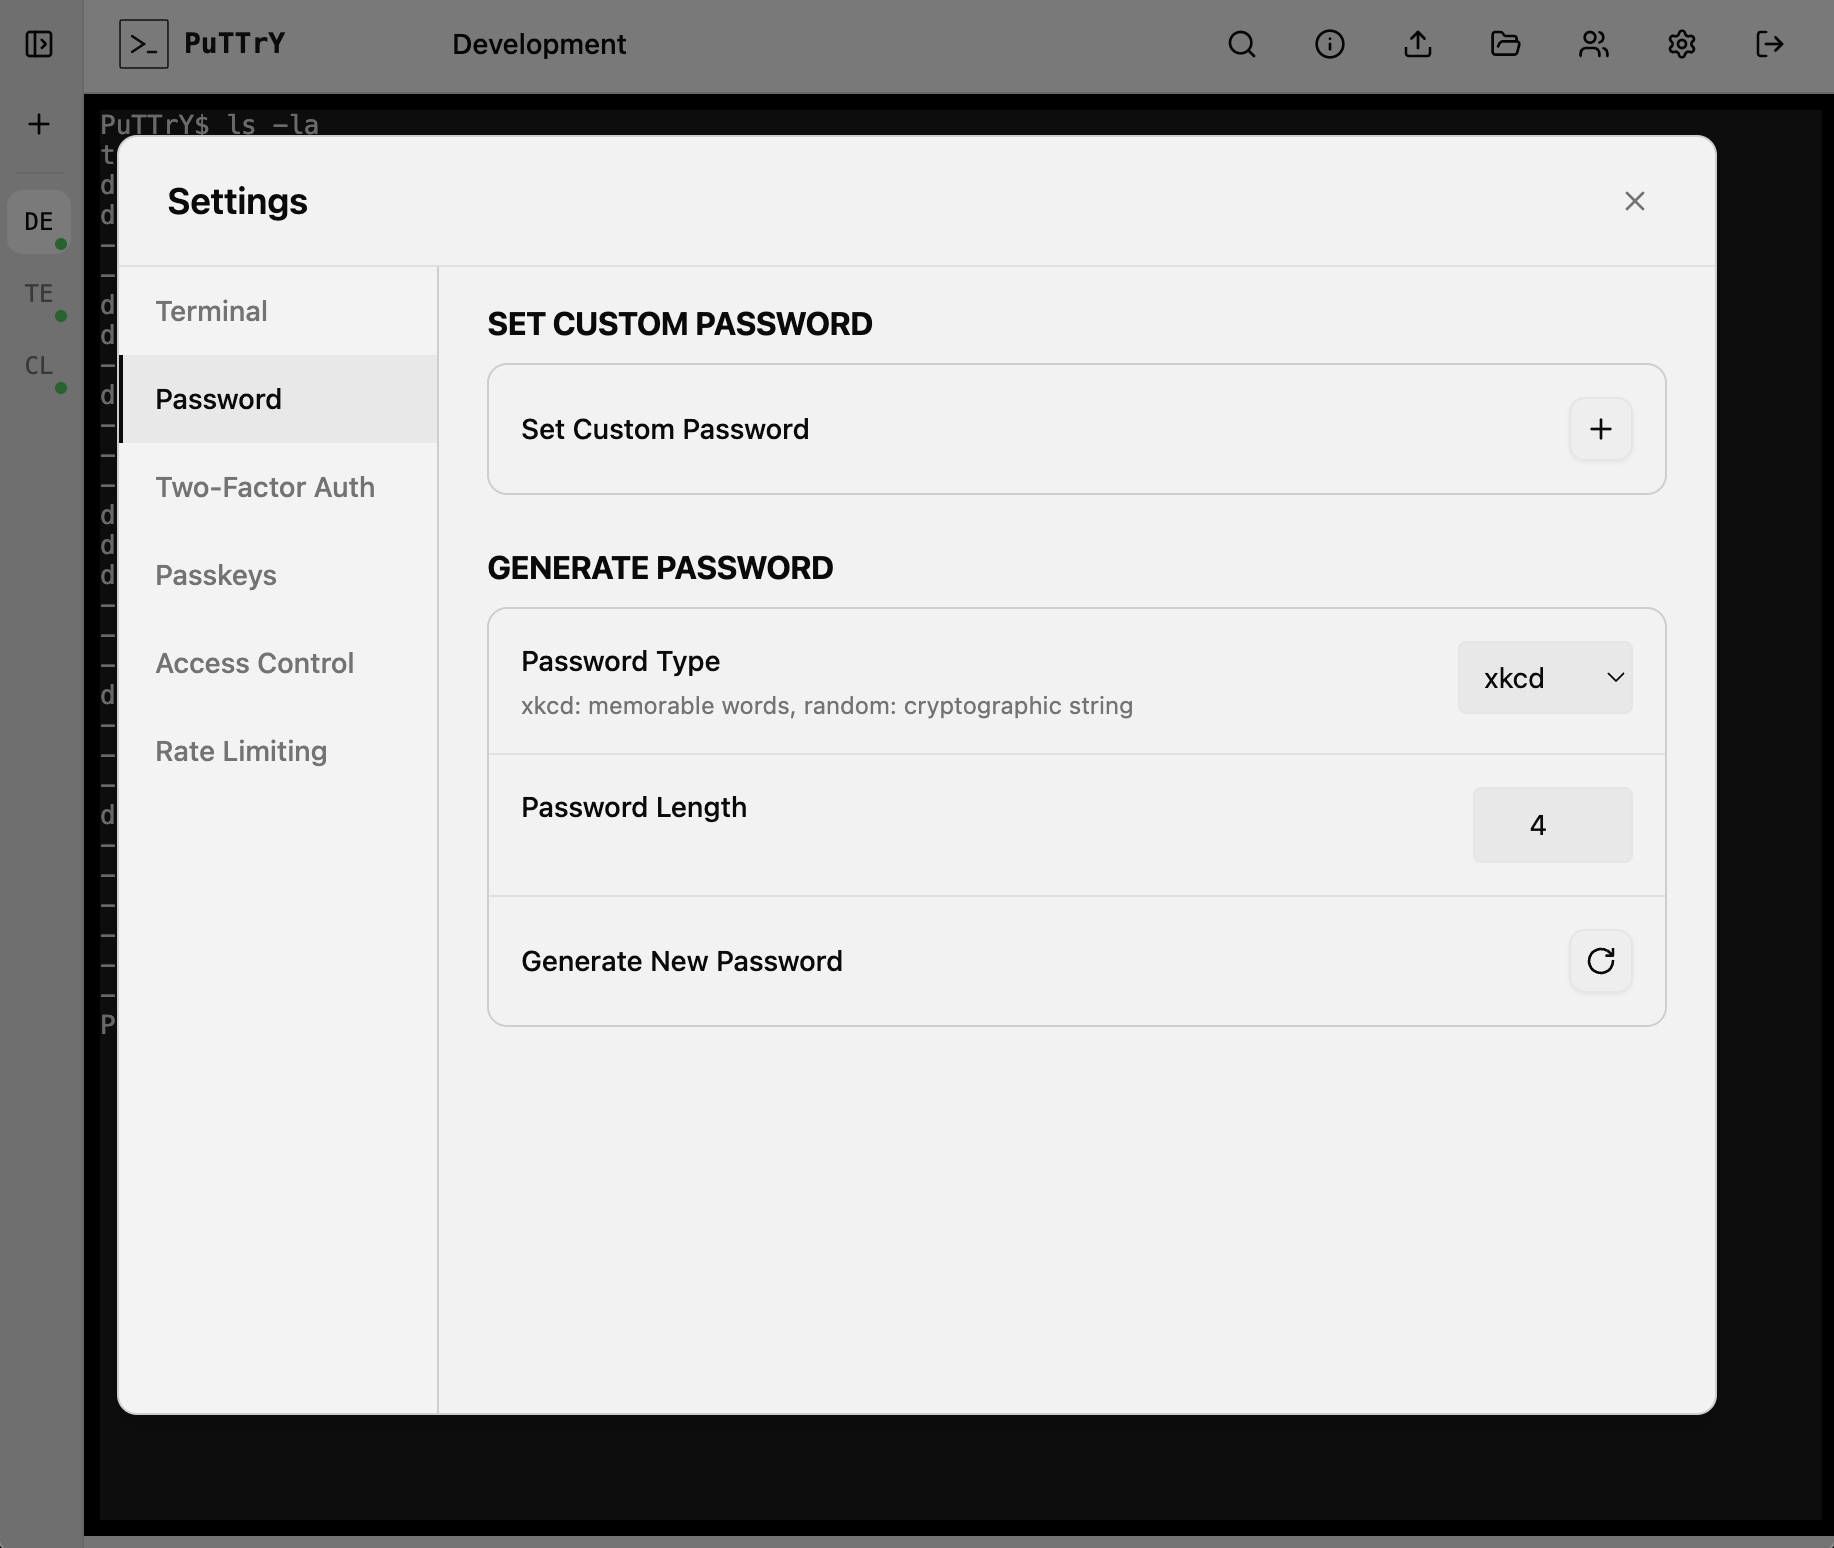
Web Settings
Manage your PuTTrY instance directly in the browser. The left screenshot shows general settings like port and password configuration. The right screenshot shows authentication options including TOTP 2FA and passkey setup for securing your instance.

|
|
Port Configuration
Each PuTTrY instance requires a unique port. If multiple users on the same server want to run PuTTrY, each must run their own separate instance in their respective home directory with a different port number.
For example:
- User A:
puttry configure→ port 5174 - User B:
puttry configure→ port 5175 - User C:
puttry configure→ port 5176
You can set the port during puttry configure or later with puttry config set PORT 5175.
Environment Variables
You can customize PuTTrY’s behavior by setting environment variables. A full list of supported environment variables is available in .env.example.
For a complete production deployment guide including systemd setup, full environment variable reference, monitoring, and backup strategies, see docs/PRODUCTION.md.
CLI Commands
PuTTrY includes a built-in CLI tool for server management and configuration:
puttry <command>
Server Management
puttry start— Start the server in the background. Displays the session password and direct link.puttry stop— Stop the running server gracefully.puttry restart— Restart the server (useful after configuration changes).puttry status— Show the current server status and port.
Password Management
puttry password set PASSWORD— Set a custom session password.puttry password rotate— Rotate to a new session password. All active sessions are invalidated; users must log in again.
TOTP Management
puttry totp enable— Enable TOTP (2FA) requirement. Users will be required to set up 2FA on their next login.puttry totp disable— Disable TOTP (2FA) requirement. The registered device is kept; useputtry totp resetto fully clear the configuration.puttry totp reset— Clear TOTP (Time-Based One-Time Password) configuration. Users will need to re-scan the QR code on their next login to set up 2FA again.
Passkey Management
puttry passkey list— List all registered passkeys with registration dates and IDs.puttry passkey reset— Remove all registered passkeys. Users will need to register a new passkey on their next login.
Configuration
puttry config list— List all current configuration values.puttry config set KEY VALUE— Update a configuration value (e.g.,puttry config set PORT 5175).puttry configure— Interactive configuration wizard. Walk through setup options with prompts.
Help
puttry help— Display the help message with all available commands.
Managing Terminal Sessions
Creating and Deleting Sessions
PuTTrY allows you to create multiple independent terminal sessions via the Web UI. Each session is a separate terminal session running on your server. You can create, switch between, and delete sessions as needed—perfect for organizing work across different tasks.
Parallel Browser Connections
Multiple browsers (or tabs) can connect to the same terminal session simultaneously:
- Shared output: All connected browsers receive the same shell output in near-real-time
- Synchronized view: Watch your shell’s progress from your phone while keeping your desktop browser open
- Write lock: Only one browser can write to a shell at any given time. This prevents chaos when multiple people are typing simultaneously.
Write Lock and Control
PuTTrY implements a per-shell write lock to coordinate input:
- Current writer: One browser has write access to the shell and can send input commands
- Read-only viewers: Other connected browsers have read-only access—they see all output but cannot send input
- Taking control: You can take the write lock from any other browser at any time. No acknowledgment or permission needed. This ensures you can always control your sessions from wherever you are
This design prevents simultaneous keyboard input from multiple sources from corrupting shell state or producing unpredictable results.
Guest Links
PuTTrY supports secure guest access via Guest Links—one-time invite URLs that allow colleagues to observe your terminal sessions without requiring your credentials.
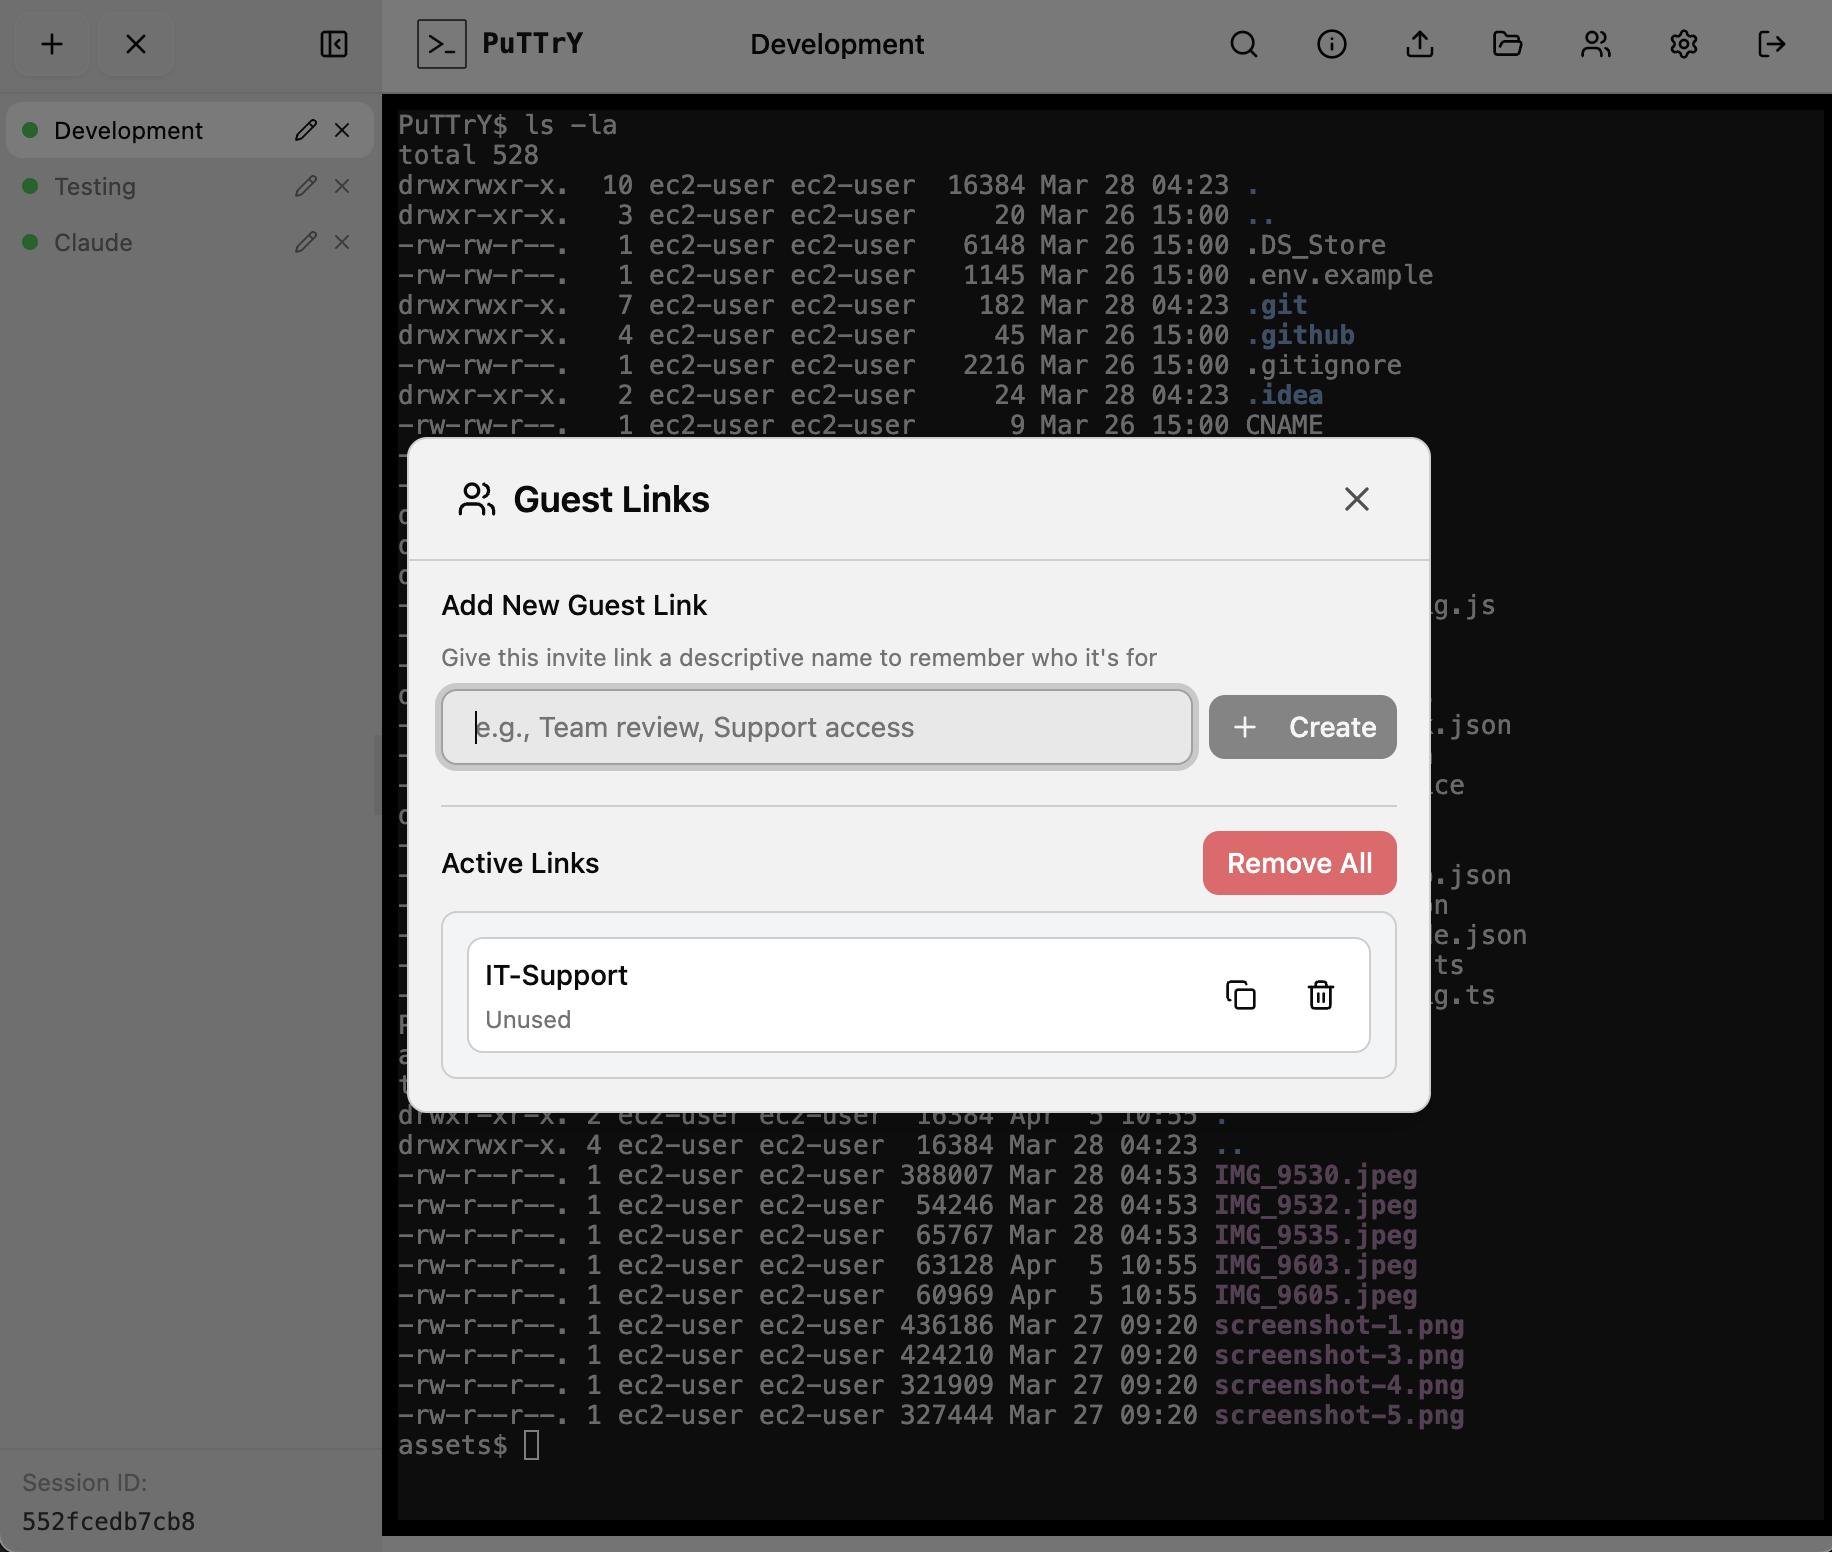
Creating a Guest Link
From the top toolbar, click the guest icon (👥) to open the Guest Links panel:
- Enter a descriptive name for the invite (e.g., “Debug session”, “Support access”)
- Click Create Link
- Copy the generated invite URL and share it with your colleague
Each link is unique and one-time use—once redeemed, the guest gains access to your terminal sessions. The link itself expires if not redeemed, and you can revoke it at any time from the Guest Links panel.
Guest View and Control Flow
When a colleague opens your Guest Link:
- Observer mode (read-only): They see all your terminal sessions and can watch output in real-time, but cannot type or send input
- Requesting control: If they want to interact with a session, they can click the session and select “Request Control”
- Approval dialog: You see a notification and a dialog asking you to approve or deny the request
- Control granted: If approved, the guest receives write access to that session. If denied, they remain in read-only mode
The same write lock mechanism applies: only one browser (guest or owner) can control a session at a time. The guest can take the lock, and you can reclaim it at any time.
Revoking Guest Access
From the Guest Links panel, you can:
- Revoke a single link: Click the delete icon next to a link to revoke it. Active guest sessions from that link are immediately disconnected
- Remove all links: Click “Remove All” to revoke all guest links at once and disconnect all active guest sessions
Guest sessions expire automatically after 4 hours of inactivity.
Security Notes
- Password not required: Guests never need your session password—only the invite URL
- Immediate revocation: Revoking a link immediately logs out any active guest sessions
- Limited permissions: Guests can only observe and request control; they cannot change your settings, create new links, or access files beyond what your user can access
- Session isolation: Each guest link is tracked separately, so you know which colleague is connected
File Manager
PuTTrY includes an integrated file manager for uploading and downloading files directly from your browser without needing to use command-line tools like scp or rsync.
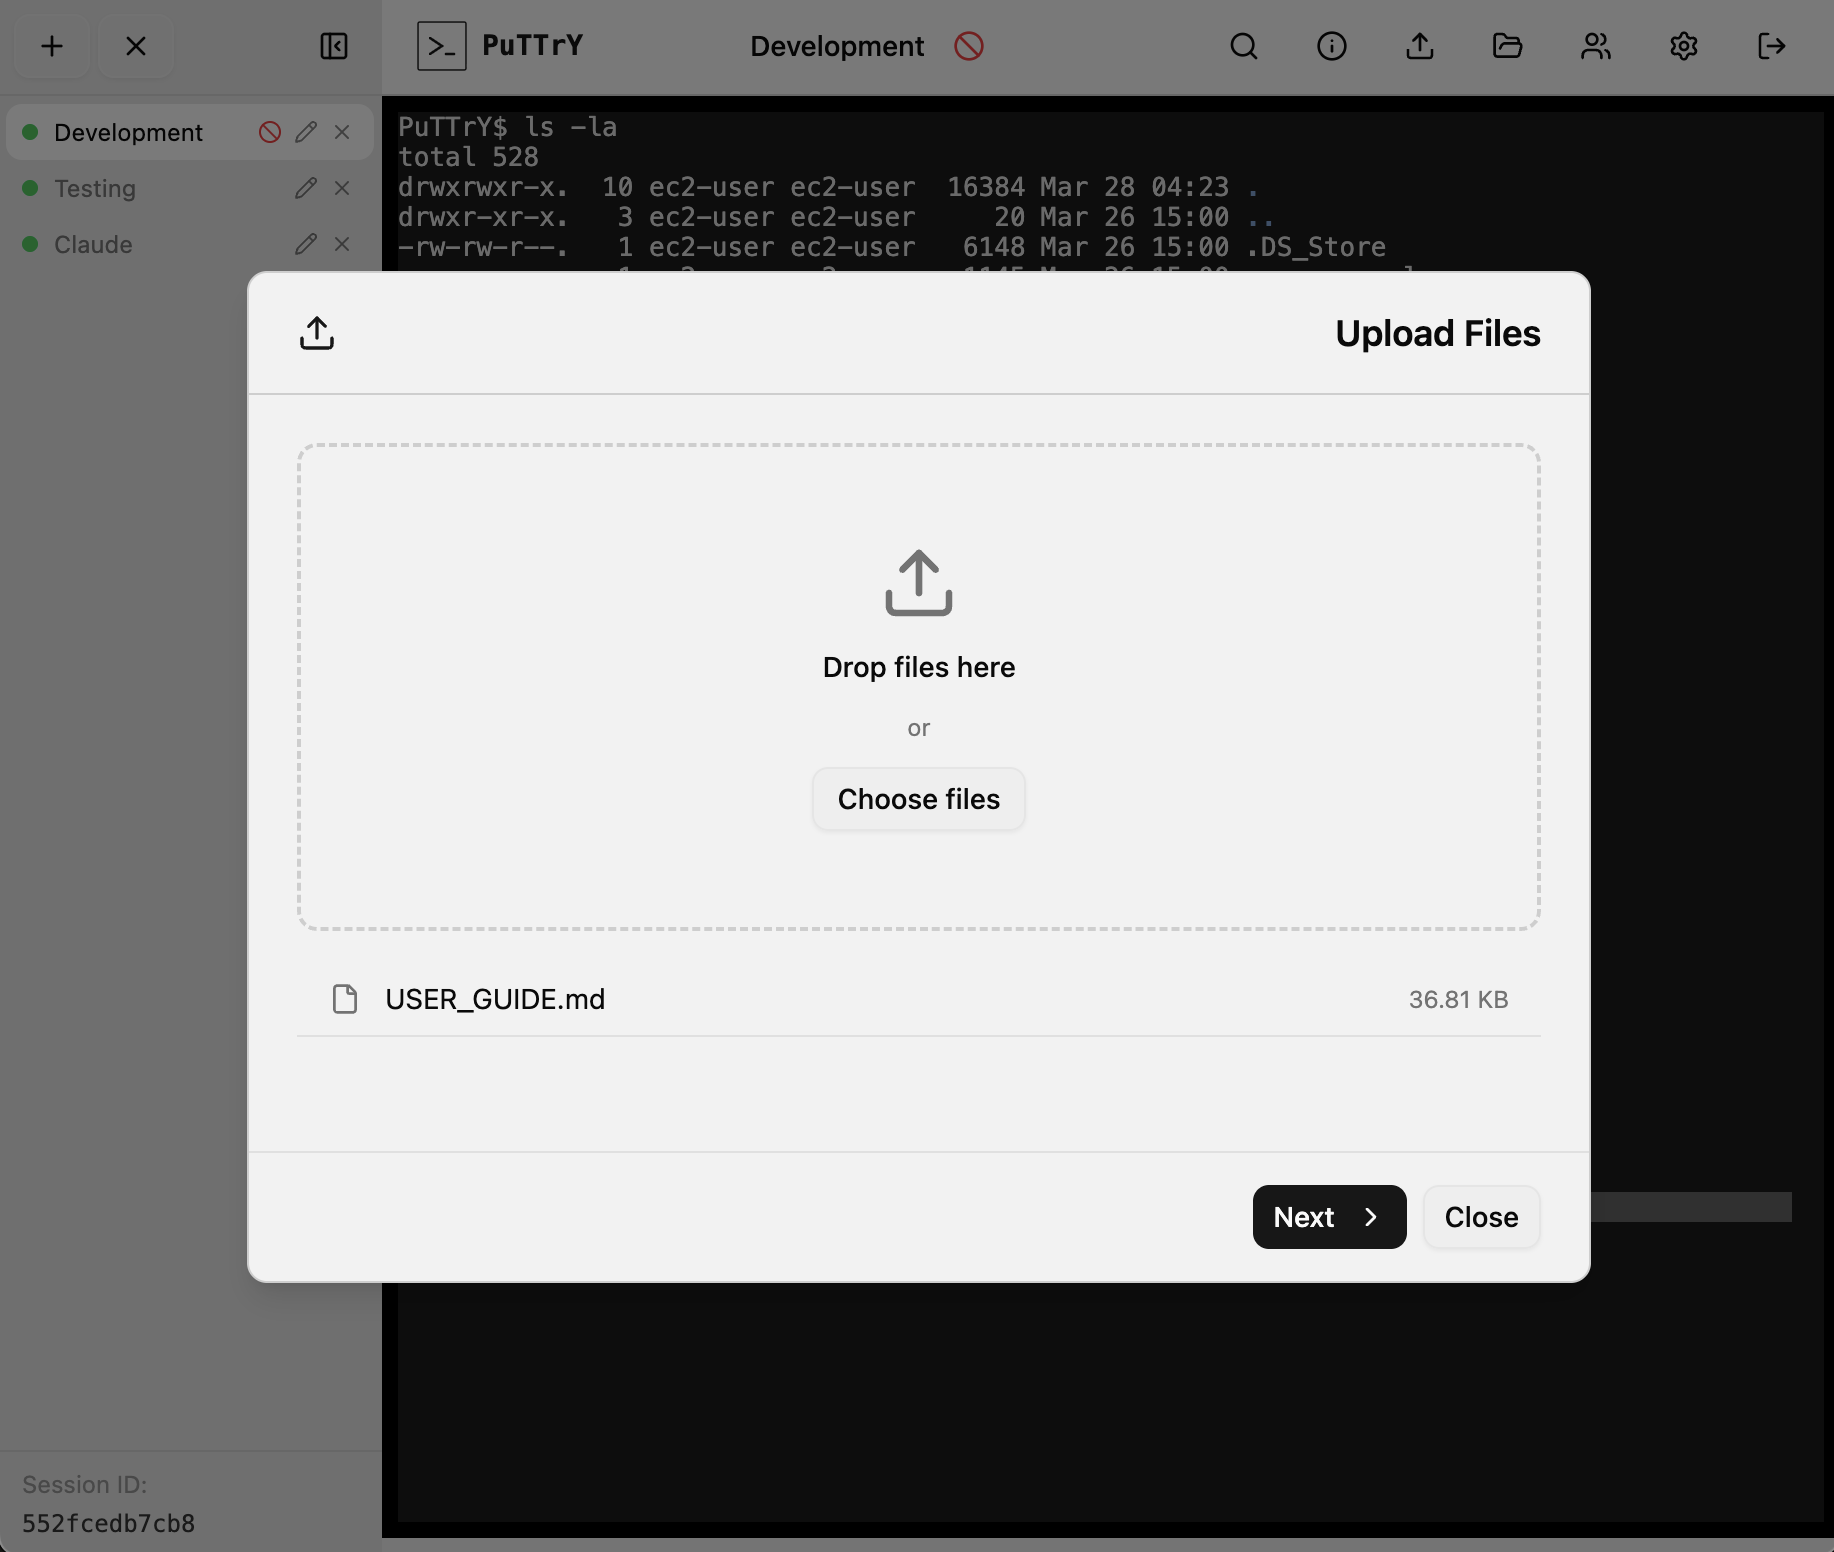
Upload
Drag and drop or open a file picker to upload files from your local machine:
- Multiple file selection: Upload one or many files at once to a destination folder
- Browser-side compression: Files smaller than 100 MB are automatically gzip-compressed by the browser before upload, resulting in faster transfers for text and compressible data
- Progress tracking: Each file displays a real-time progress bar during upload
- Retry support: Failed uploads can be retried automatically or manually
- Upload limit: 512 MB per file
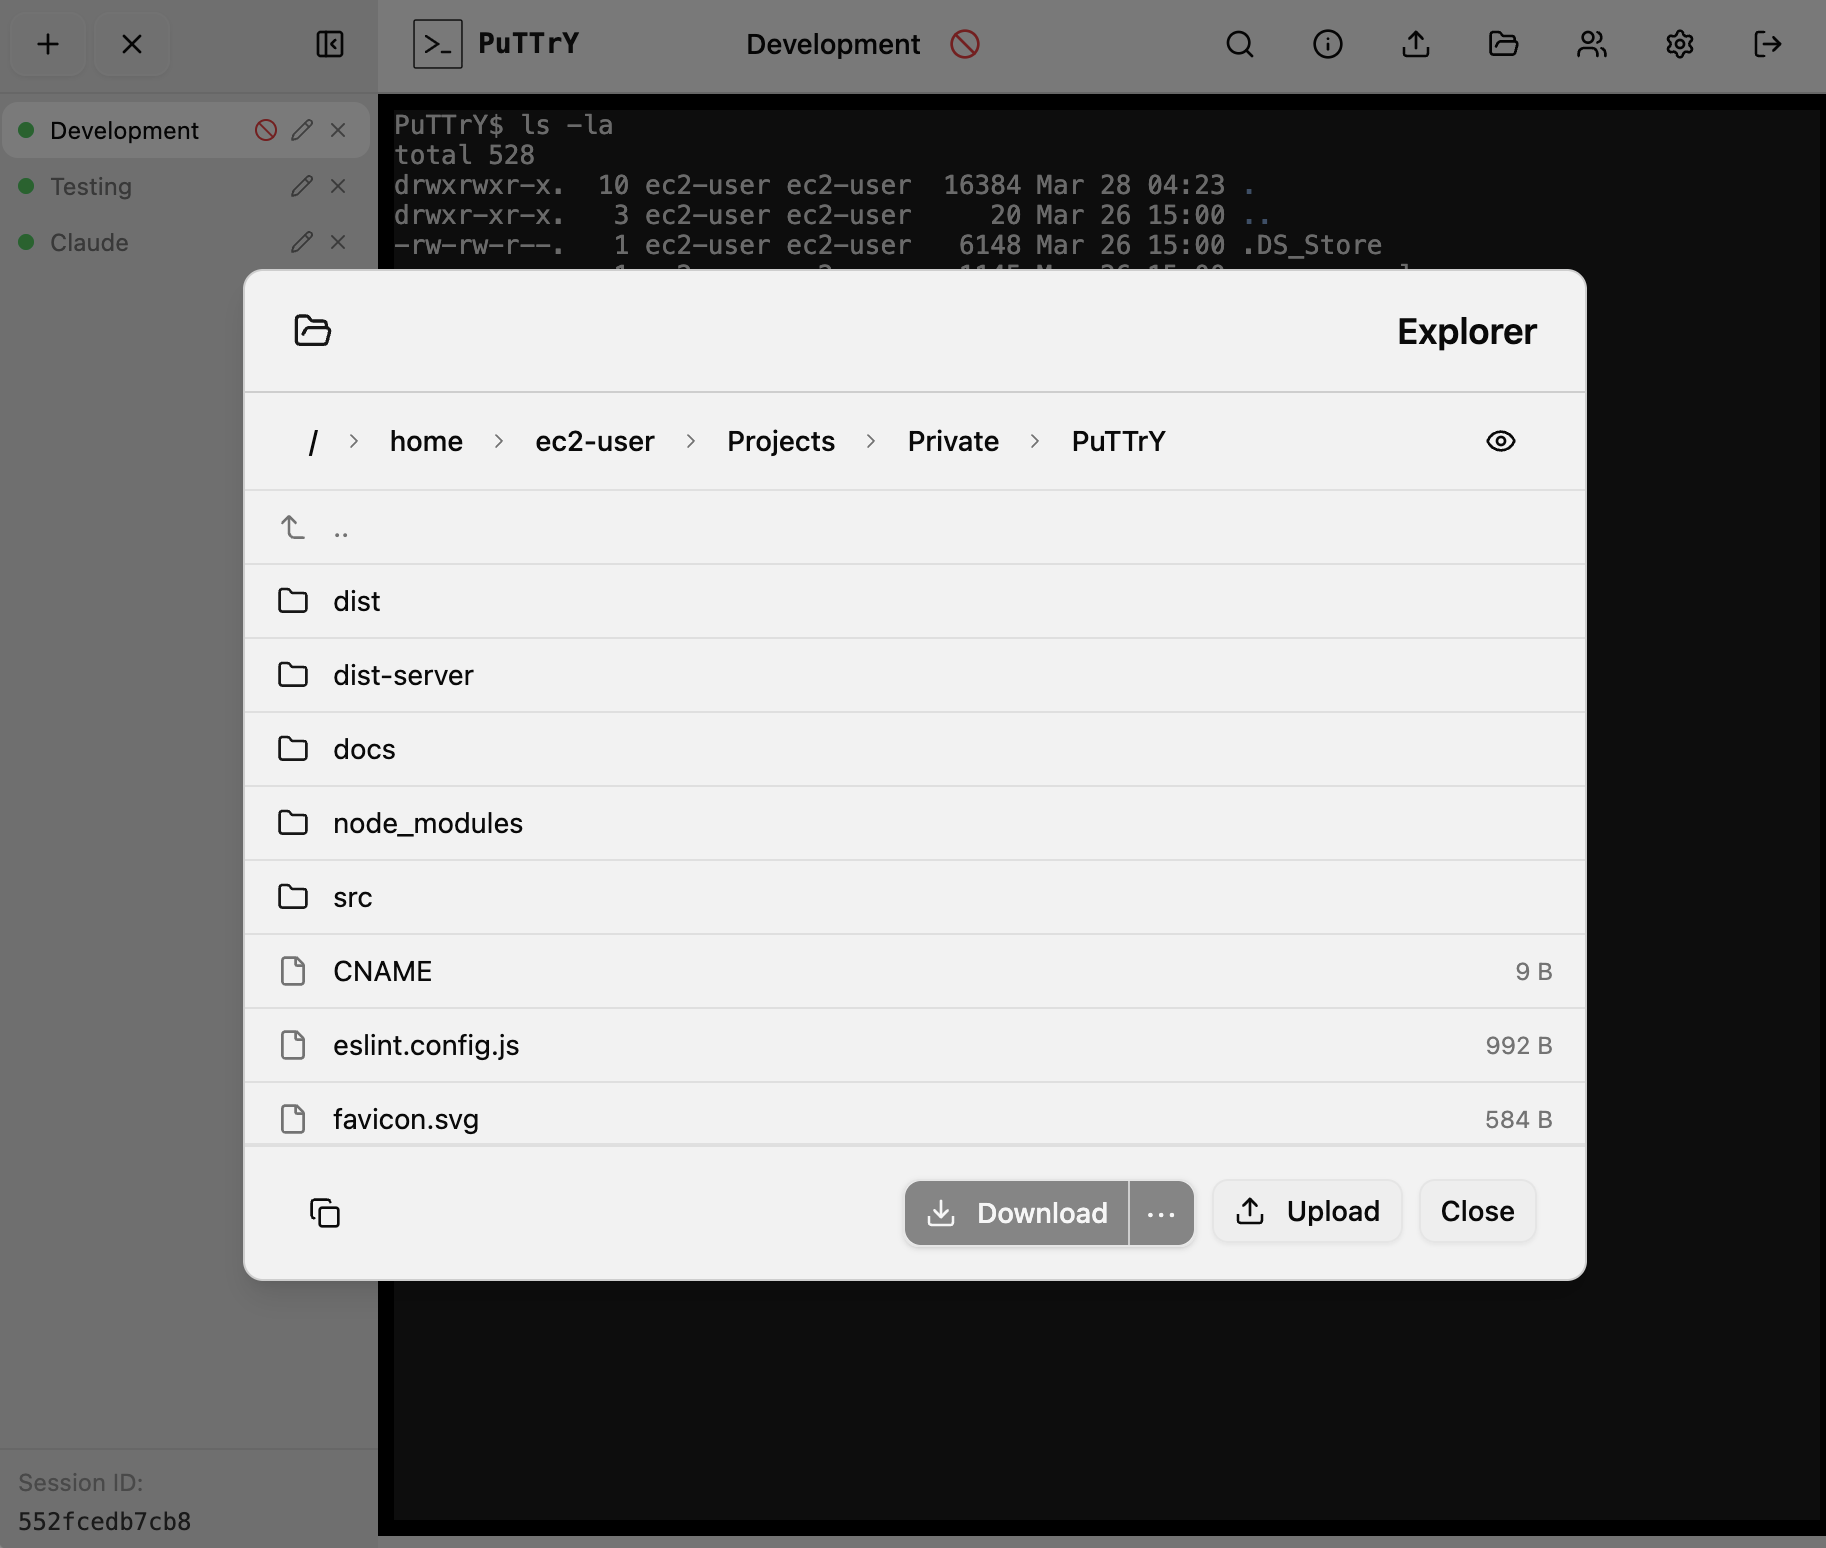
Download (File Browser)
Navigate your server’s files directly from the browser:
- Interactive file browser: Browse directories starting from
$HOME(your home directory) - Breadcrumb navigation: Click breadcrumbs to jump to parent directories
- Multi-select: Click to select a file or folder; Ctrl+click to toggle selection; Shift+click to select a range
- Single-file download: Download individual files with automatic gzip streaming from the server for efficiency
- Multi-file and folder downloads: Select multiple files or folders to download as a ZIP archive
- Size warnings: The browser warns you if your selection exceeds 100 MB
- File System Access API: On supported browsers, you can stream downloads directly into a local folder you choose; otherwise files download to your browser’s default Downloads folder
- Download limit: Single files are limited to 2 GB
Security
All file operations are restricted to your home directory ($HOME). Path traversal attacks are blocked server-side—you cannot navigate to parent directories or access files outside your home folder. Your file permissions are respected: PuTTrY uses your user’s Unix permissions to determine what you can read and write.
Security Architecture
How PuTTrY Secures Access
SSH’s security model is sound, but managing keys across multiple machines creates friction and sprawl. Every device that needs access requires its own key configuration, and revoking access means key rotation everywhere.
PuTTrY uses a simpler model: one password per PuTTrY instance, managed on the backend.
Session Password
Your PuTTrY instance is protected by a session password—a persistent credential that grants access to the PuTTrY backend itself. This password:
- Protects browser login: When you open PuTTrY in a new browser, you enter your session password to authenticate
- Persists until rotated: It remains the same until you explicitly rotate it
- Stays on the backend: The password is stored on your server (
~/.puttry/session-password.txt), not distributed to client machines - Can be rotated via Web UI or CLI: Change your password anytime using the web interface or
puttry rotate-passwordcommand
Once authenticated, your browser receives a session token (stored in a cookie). You stay logged in across multiple browser tabs, devices, and sessions—until you explicitly log out or your token expires.
Multi-Factor Authentication (2FA)
For additional security, you can require 2FA on top of your session password:
TOTP (Time-Based One-Time Password)
- After entering your session password, you must provide a code from your authenticator app (Google Authenticator, Authy, etc.)
- Each code is valid for 30 seconds
- Works on any device with an authenticator app installed
Passkey
- Cryptographic authentication using your device’s built-in security: Touch ID, Face ID, Windows Hello, or security keys
- Phishing-resistant—the server cryptographically verifies your identity, not a password
- Can be used as 2FA (in addition to session password) or as sole authentication (password not required)
- More secure than passwords, easier than key management
Why This Works Better Than Key Distribution
- One credential per server: Your password lives on the backend; there’s nothing to distribute
- No key sprawl: You don’t need copies of your credentials on every device
- Easy revocation: Rotate your password or disable 2FA instantly—no client-side changes needed
- Mobile-friendly: Authenticate from any browser without device-specific setup
- Instant policy updates: Enable 2FA, change your password, or revoke access—it applies everywhere immediately
Your security is managed centrally on the server, not scattered across machines.
For detailed security architecture information (authentication mechanisms, session management, web application security mitigations, threat model, and on-disk security), see Security Architecture.
Network and Infrastructure Security
PuTTrY’s built-in authentication (session password, 2FA, and passkeys) protects your instance at the application level. However, your server must accept incoming network connections to be reachable from browsers. Depending on your deployment scenario—personal use on a private network, shared infrastructure, or internet-facing production—you’ll need different infrastructure-level security measures.
Key considerations:
- HTTPS vs HTTP: Always use HTTPS in production unless your server is completely isolated
- Certificate management: Self-signed certs for personal use, official CA-signed certs for shared access
- Network access patterns: Direct exposure, reverse proxy, VPN tunneling, or bastion host architecture
- Cloud provider options: Leverage managed services (AWS ALB, Google Cloud LB, Azure App Service, etc.) to simplify HTTPS
- Defense in depth: Combine application authentication with network-level protections (rate limiting, WAF, IP whitelisting)
For comprehensive guidance on HTTPS setup, certificate management, VPN tunneling, reverse proxy configuration, and bastion host architecture, see Network and Infrastructure Security.
Technical Architecture
PuTTrY is built on a foundation of battle-tested technologies:
- Shell Management: node-pty handles real PTY sessions, so your shells behave exactly like local terminals
- Browser Communication: Dual WebSocket channels—a
syncchannel for coordination across browser tabs, and per-session channels for real-time terminal I/O - Bandwidth Efficiency: Only the active (foreground) session streams data to your browser; background sessions are paused to minimize traffic
- Session Continuity: Output buffer (default 10,000 lines) preserves your recent history, allowing seamless reconnection from any device
- Concurrency Control: Write lock mechanism ensures only one browser controls input at a time, while others view in read-only mode
- Terminal Emulation: xterm.js provides full VT102 terminal emulation in the browser with excellent performance
For detailed technical documentation on shell process management, WebSocket communication patterns, buffer management, and write locking, see Technical Architecture.
Development
PuTTrY is built with modern full-stack tooling: React with TypeScript on the frontend, Express on the backend, and a custom Vite plugin that integrates both seamlessly in development.
Quick start:
npm install
npm run dev
The dev server runs on http://localhost:5175 with hot module reloading (HMR) for both frontend and backend. React components update instantly; server code changes may require a refresh. The Vite plugin mounts Express as middleware and handles WebSocket upgrades for real-time terminal I/O.
Key development workflows:
npm run dev– Start with HMR enablednpm run build:all– Build production bundlesnpm run lint– Check code stylenpm start– Run production build locallyAUTH_DISABLED=1 npm run dev– Skip auth for testing- Debugging: Browser DevTools for frontend, server logs for backend, Network tab for WebSocket activity
Project structure:
src/client/– React frontend (components, hooks, app entry)src/server/– Express backend (routes, PTY manager, auth, WebSockets)src/lib/– Shared utilitiesvite.config.ts,tsconfig.json– Build and type configuration
The custom Vite plugin (vite-plugin.ts) handles the Express integration and WebSocket upgrades for /sync (session coordination) and /terminal/:sessionId (PTY I/O).
For comprehensive development documentation including setup, project structure, build processes, debugging techniques, and performance considerations, see Development.
Contributing
PuTTrY is currently feature complete for its intended purpose: remote shell access and file transfer via a browser. The goal is to keep it slim and focused — not to grow it into a general-purpose platform.
That said, contributions are welcome in the areas that matter most:
- Bug reports: Found something broken? Please open an issue with steps to reproduce.
- Security issues: Found a vulnerability? Please report it responsibly via a GitHub issue (or privately if the impact is significant). Security fixes are the highest priority.
- Mobile compatibility: Encountered something broken or awkward on a mobile browser? Reports and fixes for mobile UX issues are especially appreciated.
- Stability improvements: Crashes, edge cases, error handling — anything that makes the tool more reliable.
- Meaningful new features: If you have an idea that fits PuTTrY’s purpose well, open an issue to discuss it first before writing code. The bar for new features is intentional scope fit, not just usefulness in general.
Before Opening a Pull Request
- Open an issue first if you’re working on anything beyond a small bugfix, so there’s alignment before effort is spent.
- Run tests with
npm testand make sure they all pass. - Keep changes focused — small, targeted PRs are much easier to review than large ones.
Feedback, suggestions, and ideas are always welcome even without a code contribution.
Connect
Follow me on LinkedIn for updates on PuTTrY and other projects.
License
MIT — see LICENSE for details.